The use
Generate a pdf invoice based on deal, line item And company data and mail it to the contact and your accounting system
Install leadstreet's invoice app
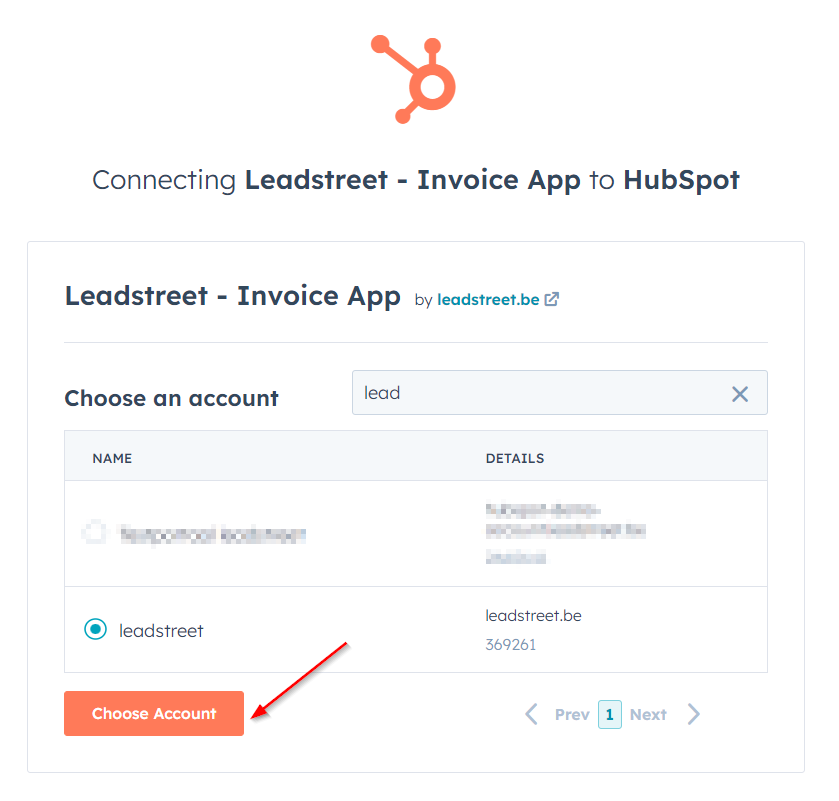
First Sign in to your HubSpot account or create a new HubSpot account and choose the account you want to connect + click Choose Account
Follow this link to the installation page and select your HubSpot portal account.
You can use the search bar to find the account you want to register more easily if you have multiple HubSpot accounts.
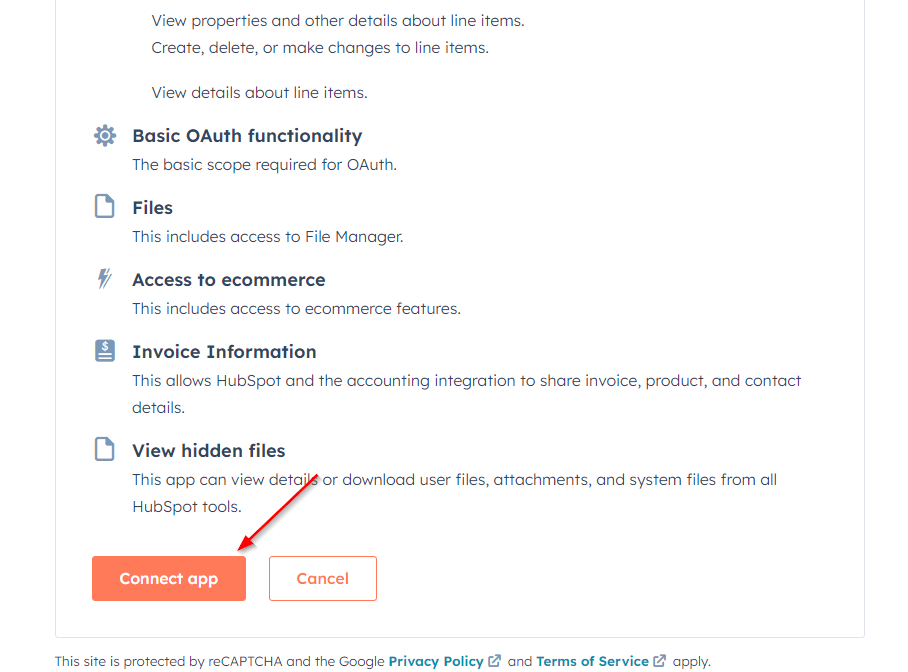
Click Connect app in the following screen
Create your Leadstreet invoice app account by filling out your login details + confirm the verification email
Choose a save password

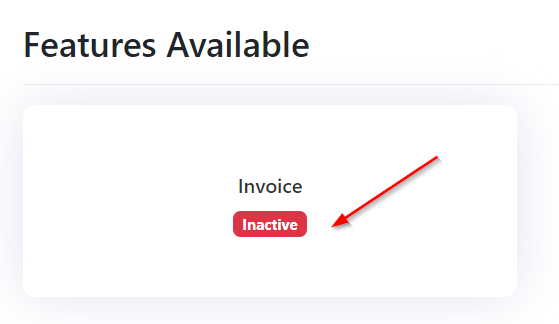
Click on Invoice Inactive + click Activate on the following screen to activate the leadstreet invoice app

Now you can consult the leadstreet invoice app in your HubSpot portal under Integrations > connected apps
First, you have to setup the invoice app to get started
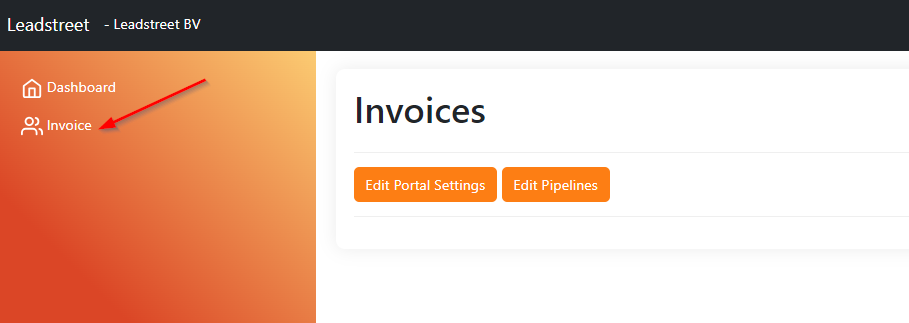
Therefore click Invoice in the left side menu
Click Edit Portal Settings to setup all necessary portal settings
PORTAL SETTINGS
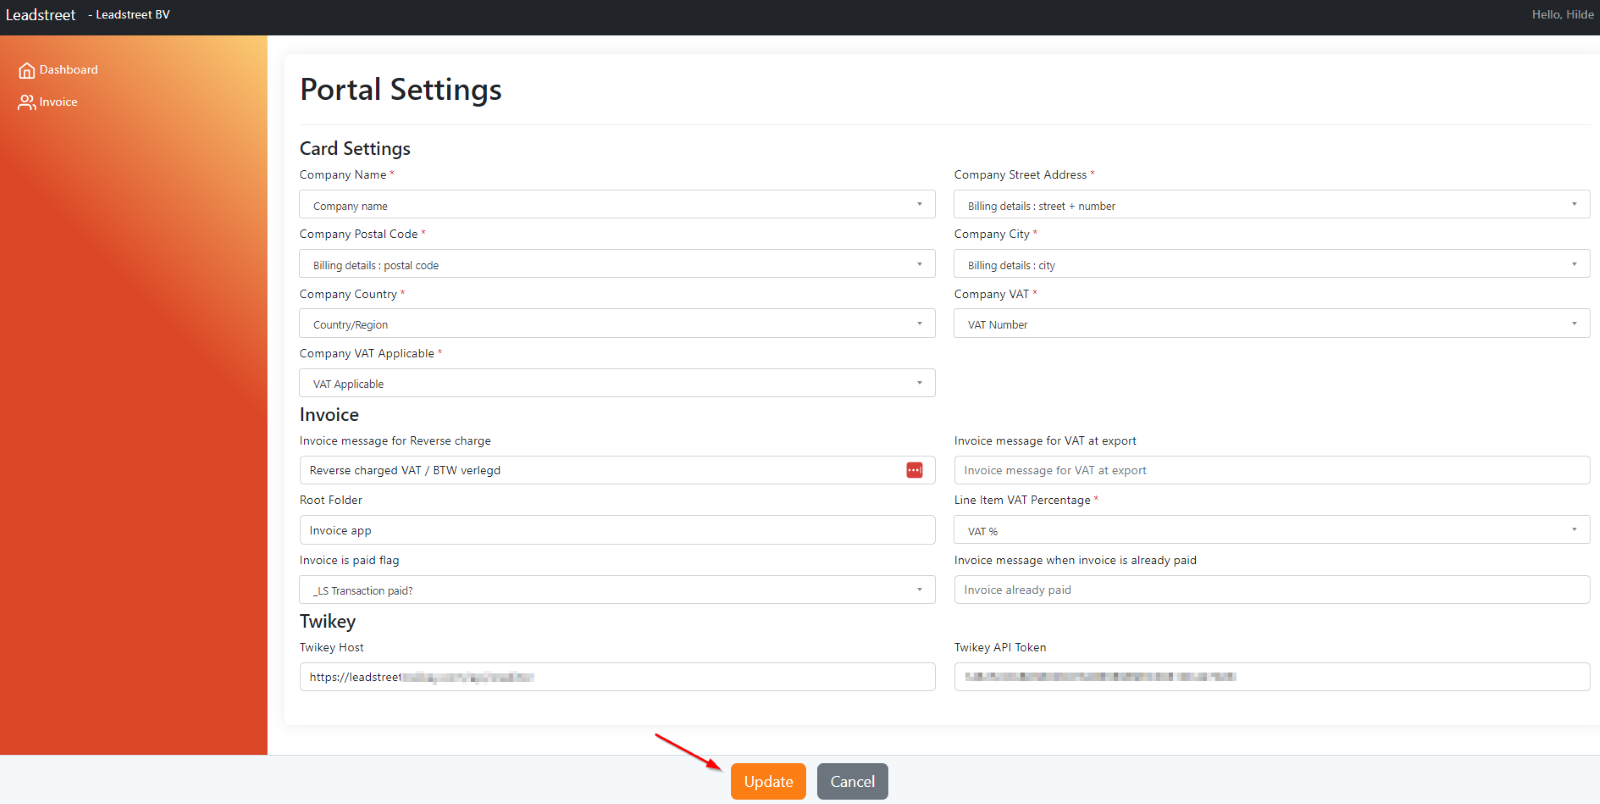
Card settings
Card settings are all the settings of the client that are needed to generate the invoice. The properties needed here are company-based properties.
You can select an existing company-based property of your HubSpot portal or you can create a new one into the invoice app.
Repeat the setup for all fields by choosing an excisting property or creating a new one into the invoice app.
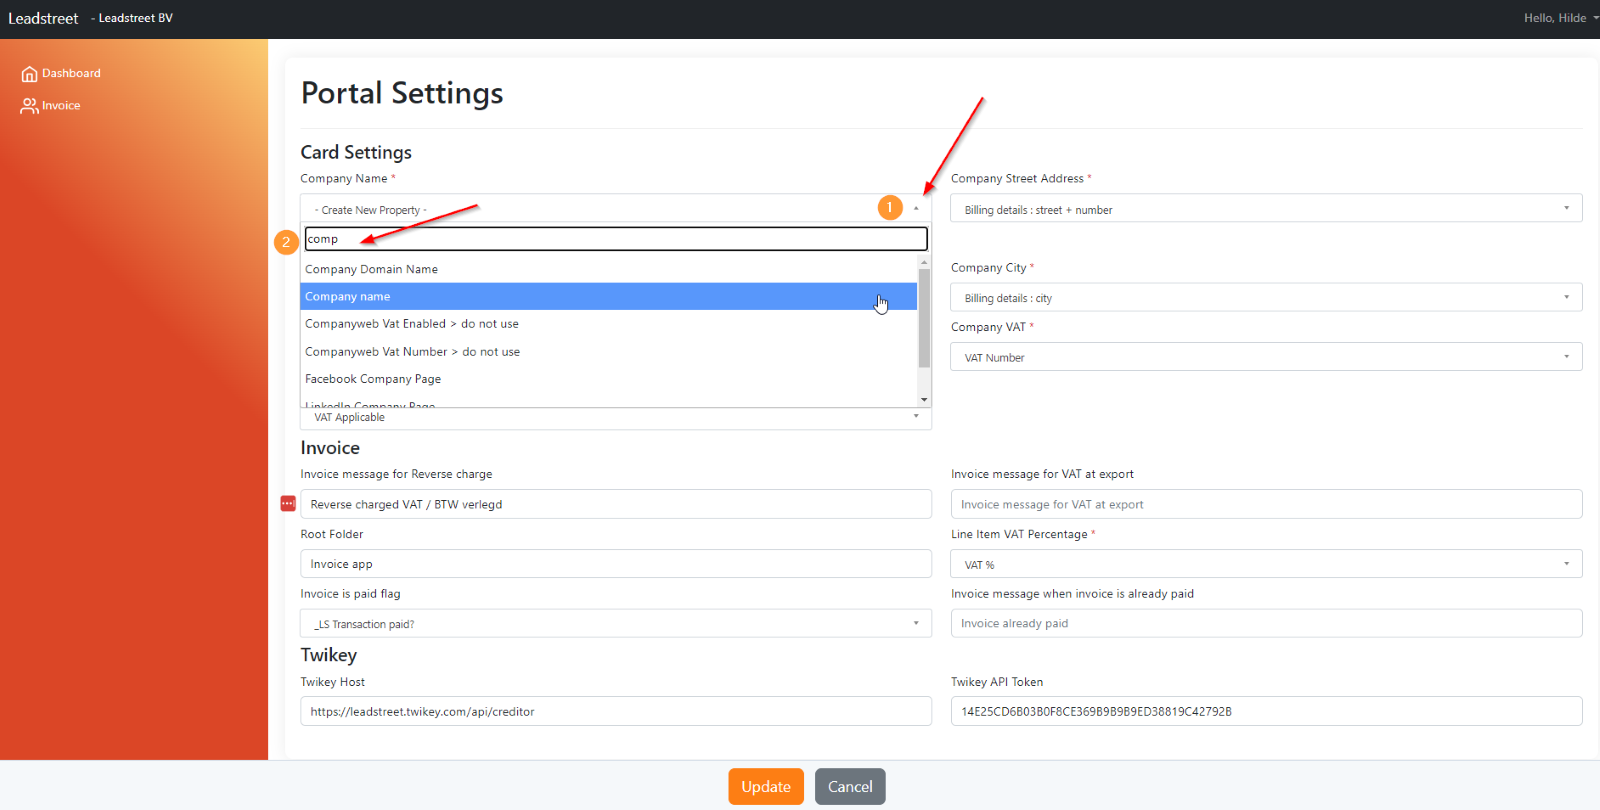
Select an existing company-based property
Click the arrow to choose + click into the search field to choose an existing company-based property. You can repeat this to setup all fields.
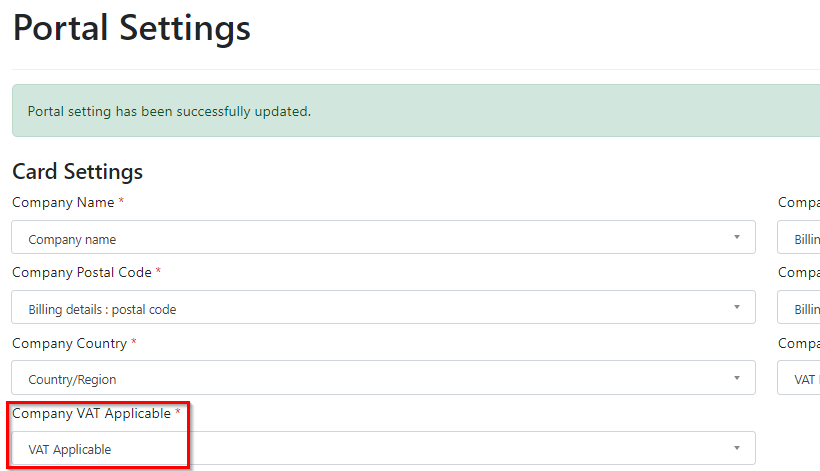
You can only save/update your settings if they are all fillout.
Create a new company-based property into the invoice app
Click the arrow + choose - Create New Property - (in top of the list of properties shown).
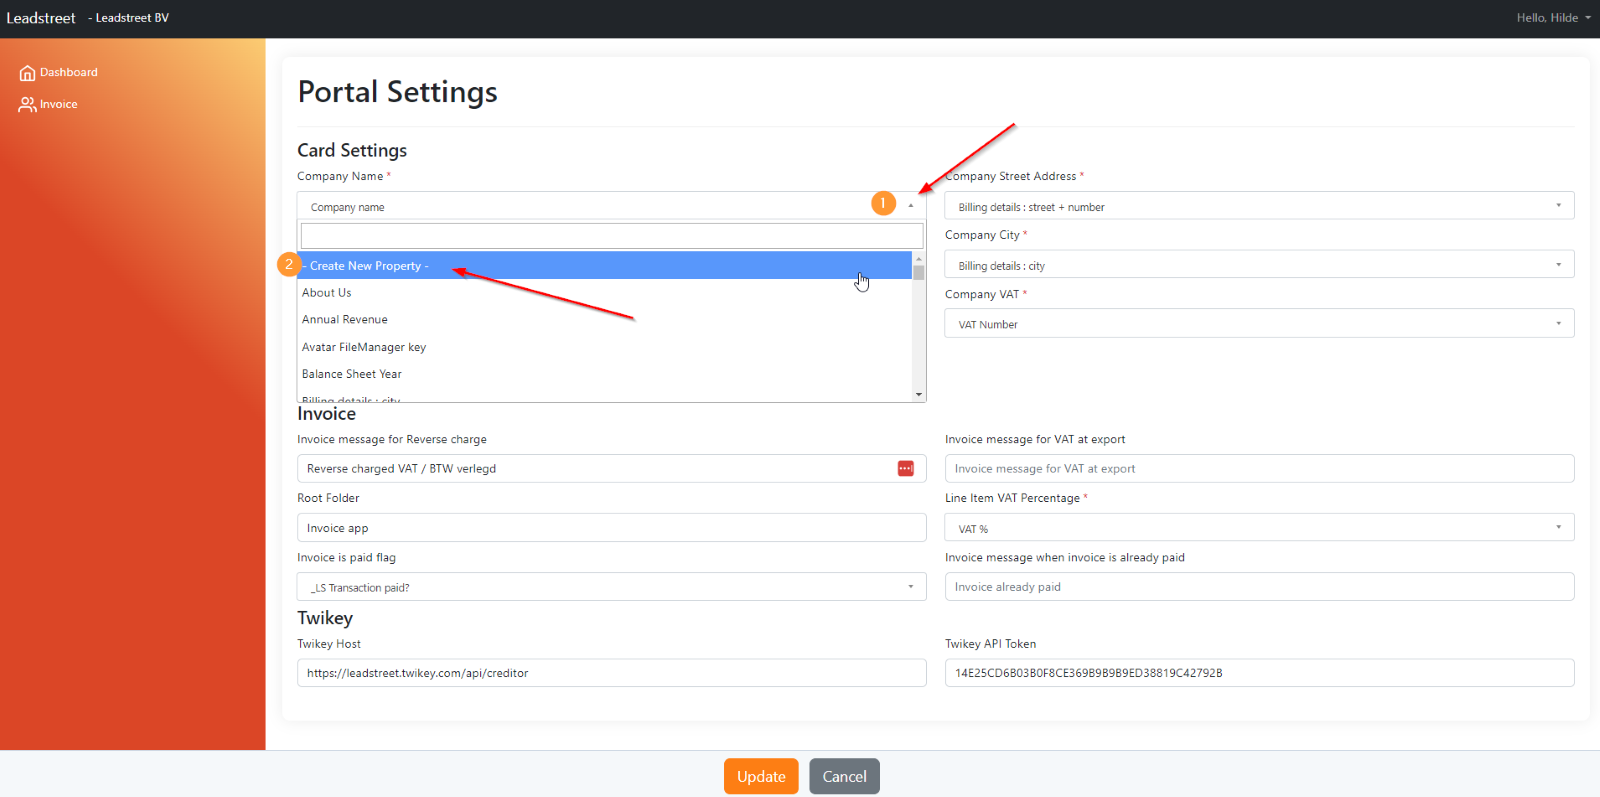
Typ the name of the new property and the property will be created as you save/update your settings.
You can only save/update your settings if they are all fillout.
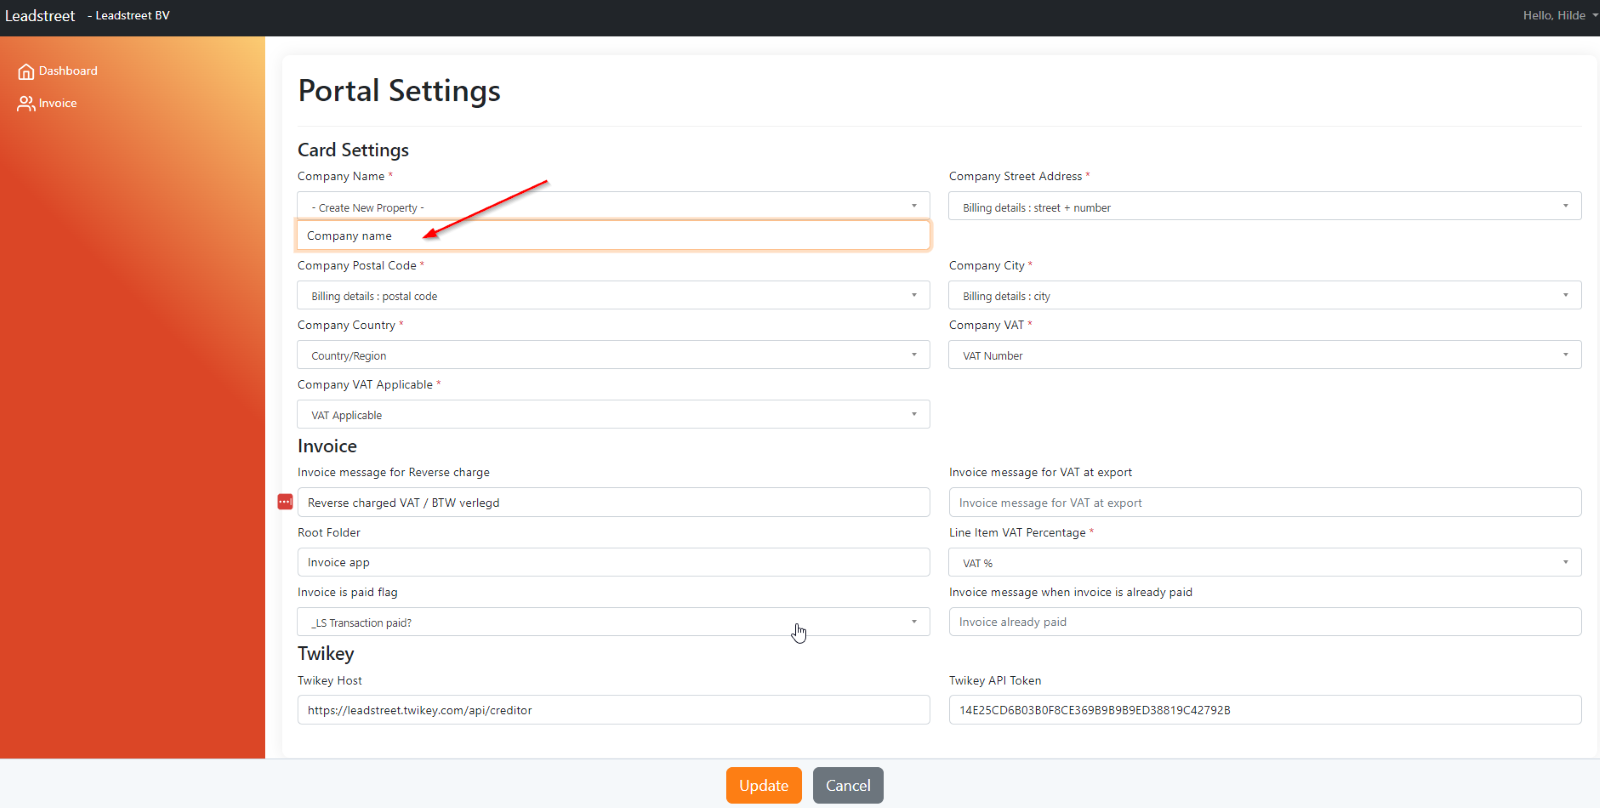
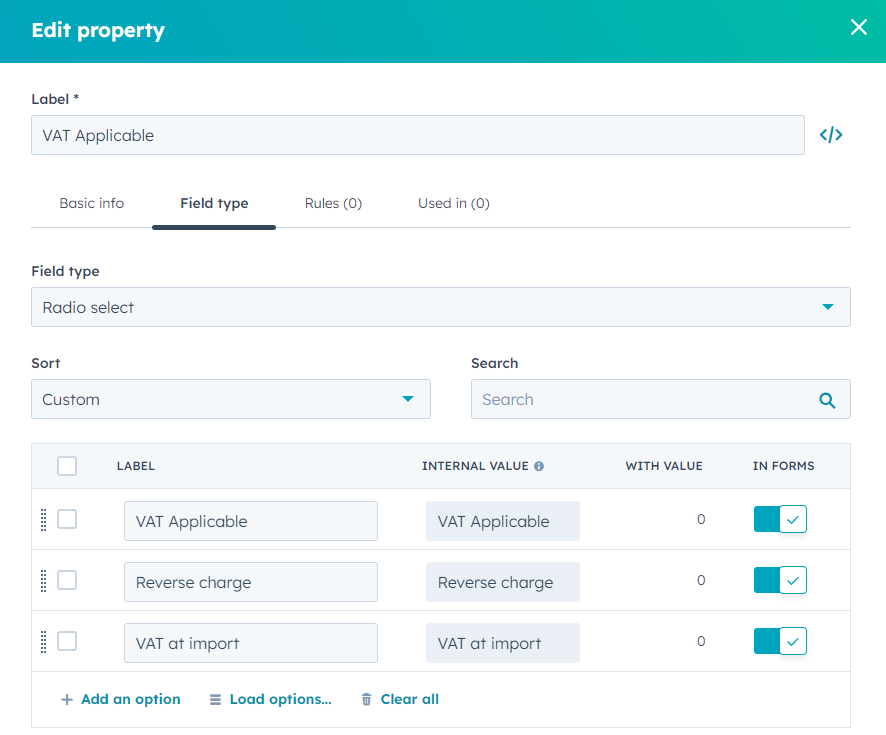
Create a company-based property for VAT Applicable into the invoice app. Give the property the name you want + click enter to confirm. In this use case property name: VAT Applicable.
The 3 possibilities (VAT Applicable, Reverse charge and VAT at export) will be generated automatically into your HubSpot account.
For the invoice messages regarding VAT, you have to fill out the VAT text and article of VAT code of law applicable for your company/country

Root folder is the location where the invoices will be preserved into your HubSpot portal.
Choose a name for your Root folder. It’s will be created by making your first invoice.
Pro tip : For each pipeline you setup the invoice app, you can define a subfolder (into the pipeline settings).
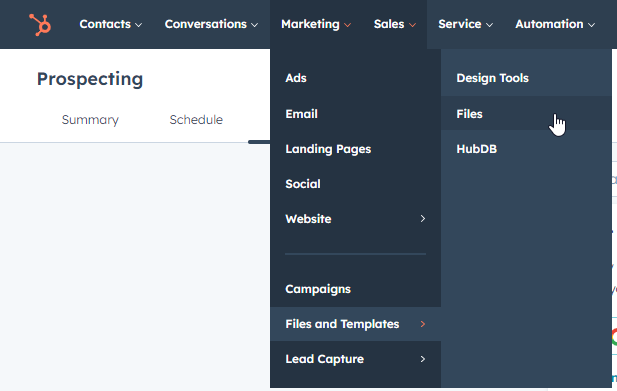
After making your first invoice, you can consult the Root folder into your HubSpot portal under the menu Markteing – Files and templates – Files.
Line Item VAT Percentage : Choose or create here the product-based property that represents the VAT percentage of your line item.

This is where you can consult the Line Item VAT Percentage into your HubSpot portal
Settings – products

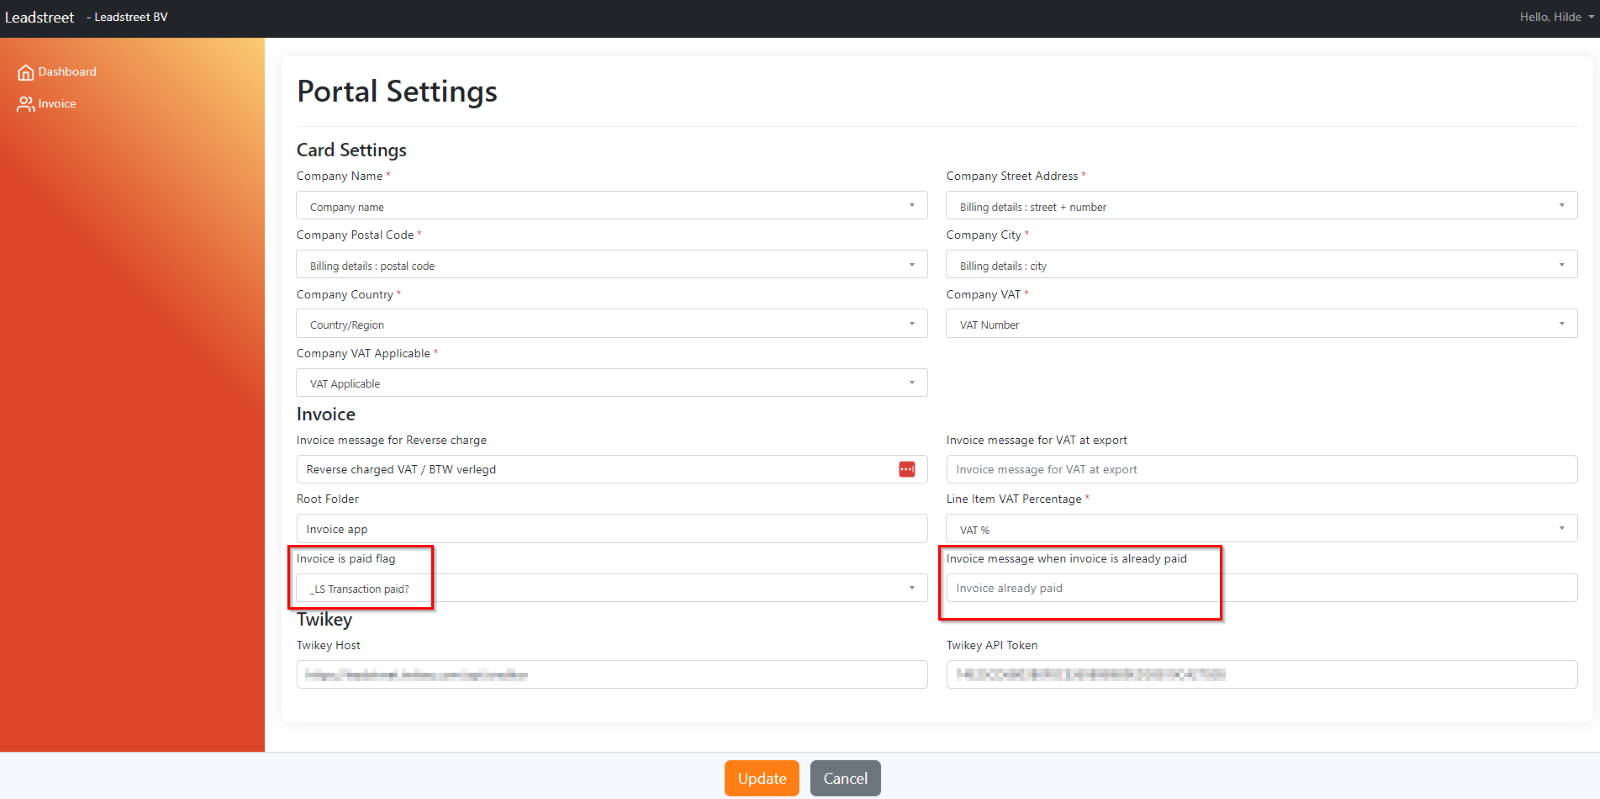
Invoice is paid flag: Choose or create here the deal-based single checkbox property that indicates if the invoice is paid or not. The values (true/false) are created automatically.
Invoice message when invoice is already paid. Here you define the message you want to be displayed on the invoice when the invoice is paid.
Pro tip : If the invoice is not paid you can send a payment link and a structured message with the invoice. You find the setup under the Pipeline settings of the invoice app.
Twikey
You need a Twikey API key to fillout the Twikey Host and Twikey API Token in your inoive app.
You can create a Twikey account on https://www.twikey.com/
Create a Twikey API key
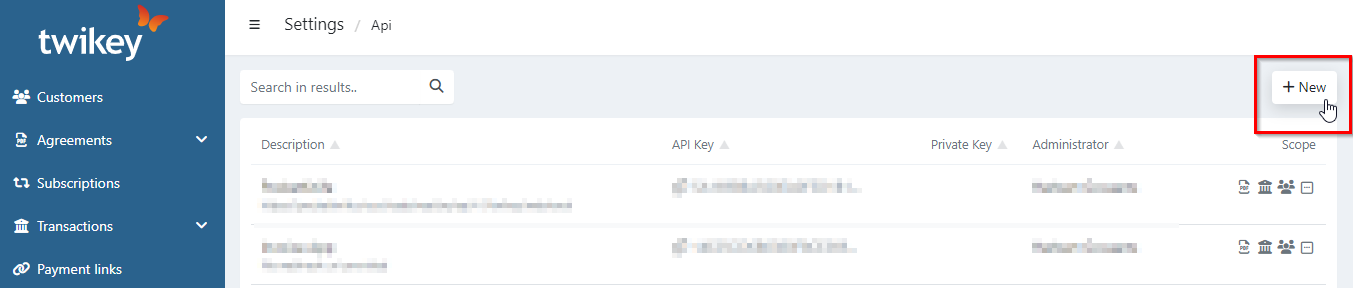
Choose Settings + Api in the left side bar of Twikey

Create a new Api by clicking + New in the right top corner
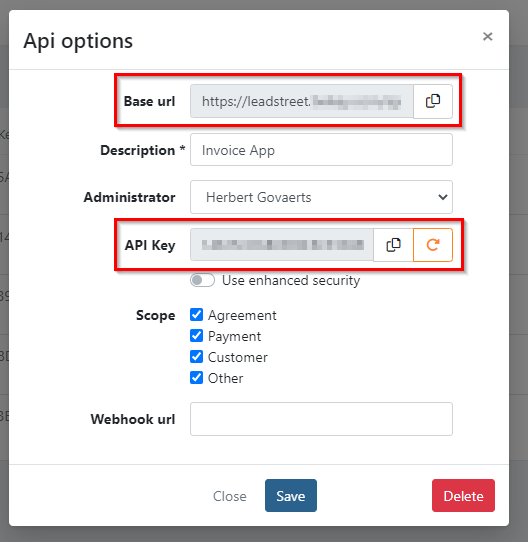
Fill out Api Options : description + select all checkboxes under Scope + Save to confirm
Now you can consult the Api under settings

To setup the Twikey into the invoice app
Copy Twikey Base url + paste on Twikey Host of your invoice app
Copy Twikey Api key + paste on Twikey API Token of your invoice app
+ click Update to confirm your invoice app setup
Congratulations!
You just finished the Portal Settings.
Now, you can setup the Pipeline Settings. Click Invoice into the left side menu and choose Edit Pipelines.

PIPELINE SETTINGS
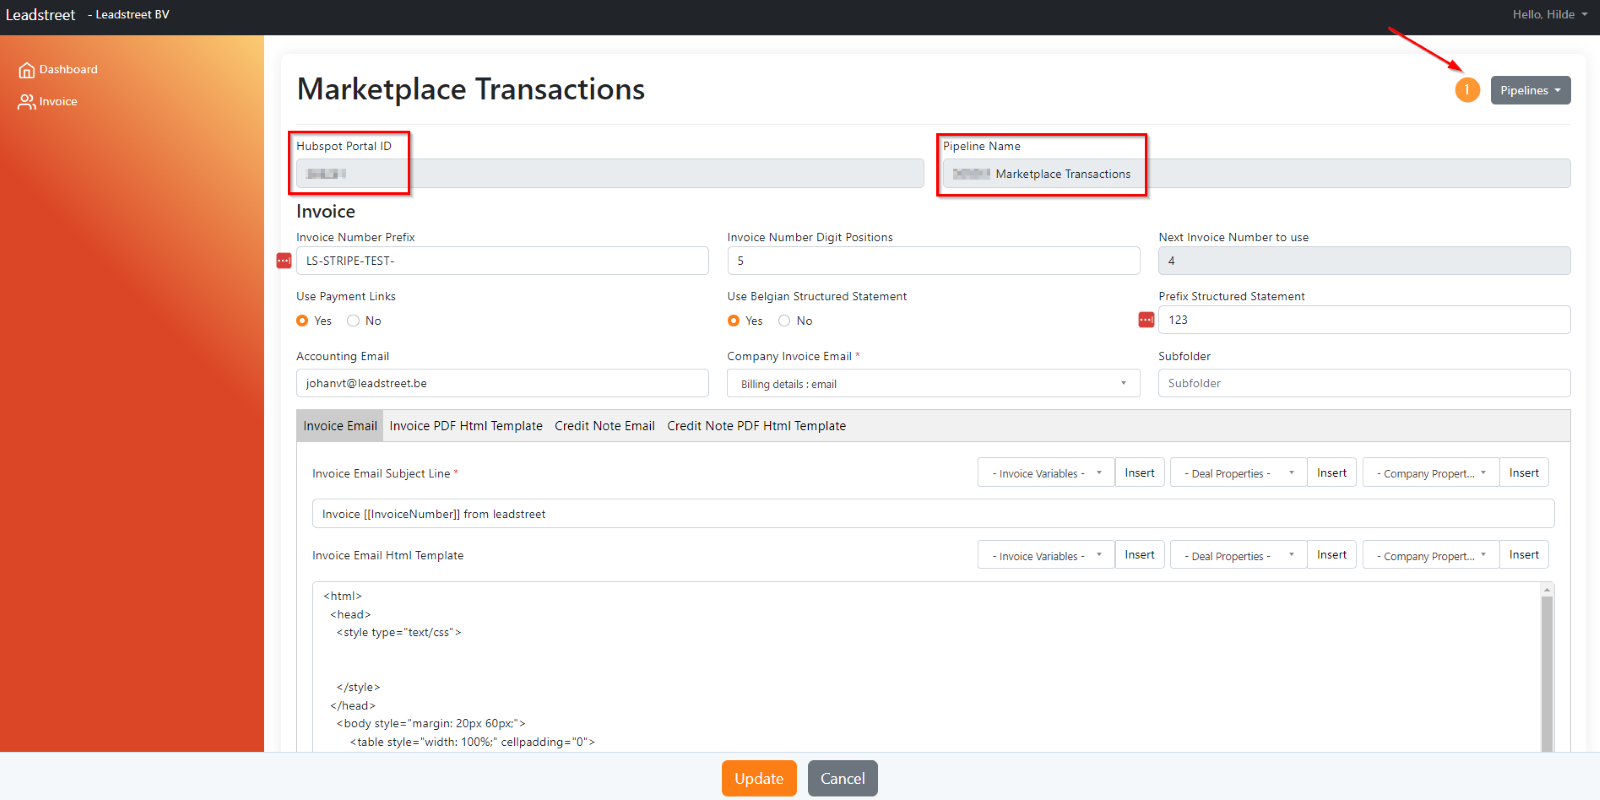
First select the pipeline in the right top corner for which you want to use the invoice app.
The HubSpot Portal ID and the Pipeline name are displayed on the top.
Setup all invoice properties as preferred
You have to know that the invoice app always starts at invoice number 1. So maybe you have to start with a new accounting ledger.
Invoice Number Prefix: Choose a prefix for your invoice numbering if wanted (not required)
Invoice number Digit Positions: define the amount of digits of your invoice number (not required)
Next Invoice Number to user: is not possible to change and always starts with 1. Therefore it can be possible you have to start from a new accounting ledger.
Use Payment Links: define as Yes if you want to use a payment link on your invoice when the invoice was not paid yet (not required)
Use Belgian Structured Statement: define as Yes if you want to use a Belgian structured statement on your invoice when the invoice was not paid yet (not required)
Prefix Structured Statement: define a prefix with which the the Belgian structured statement has to start (required when choosing for structured statement)
Accounting Email: the e-mail where your invoices has to be sent to internally (within your company). F.ex. to an accounting mailbox or directly into your accounting tool
Company Invoice Email: the Client e-mail to whom the invoice has to be sent. REMARK : Make sure the e-mail is on the company record.
Attention! Make sure the e-mail is on the company record.
Subfolder : choose a name for a subfolder (not required). When you use the invoie app on different pipelines, it can be interesting to structure the Root folder with a subfolder per pipeline.
Invoice Email Subject Line: define the subject line of the email sending the invoice. You can add personalized tokens as invoice number, deal properties or a company property. Click on the menu next to Invoice Email Subject Line + choose property + Insert
Invoice Email Html template: define the content of your email to send the invoice. You can personalize it with properties. Or we can do this for you.
Repeat this for Invoice PDF Html Template, Credit Note Email and Credit Note PDF Html Template.
Confirm setup by clicking Update at the bottom.

HOW TO MAKE AN INVOICE FROM YOUR HubSpot PORTAL?
First of all, you need to setup the products you want to invoice. Because the invoice app is using line items.
Read the HubSpot Knowledge base to create products
+ fillout the Line Item VAT Percentage (you created in the invoice app settings). This represents the VAT percentage of your line item.
The invoice app relies on company data and line items. So if needed, setup workflow(s) to gather all invoice data. We can support you with that.
Create invoice
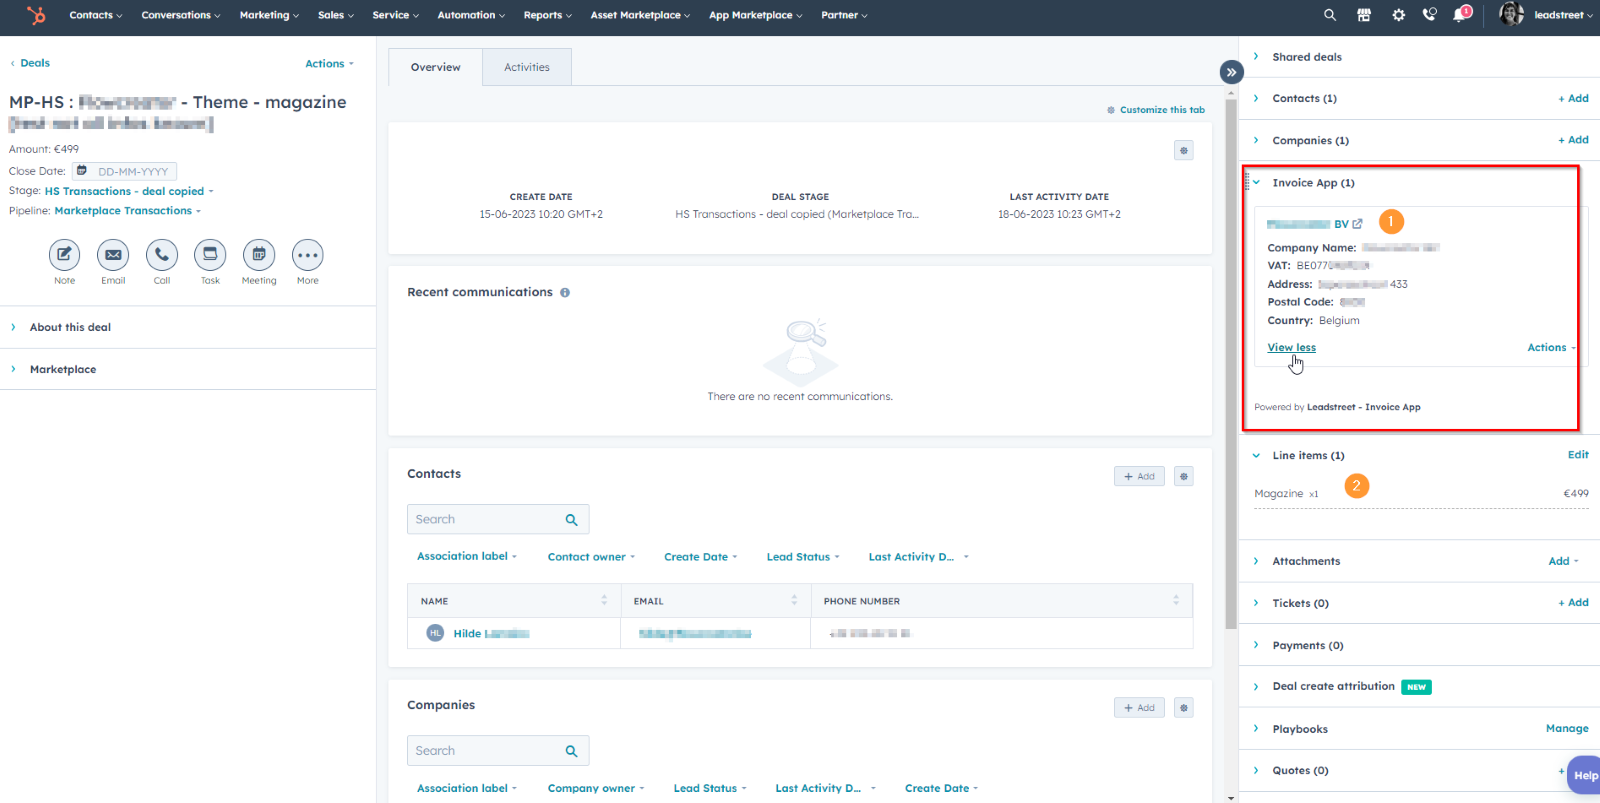
Once all invoice data is complete/fillout correctly, it will be shown in the Invoice app in the right side menu of the deal into your HubSpot portal.
You can choose to see more or less details. And below the invoice app data, you can consult the line item(s).
Click Actions + Create and sent invoice
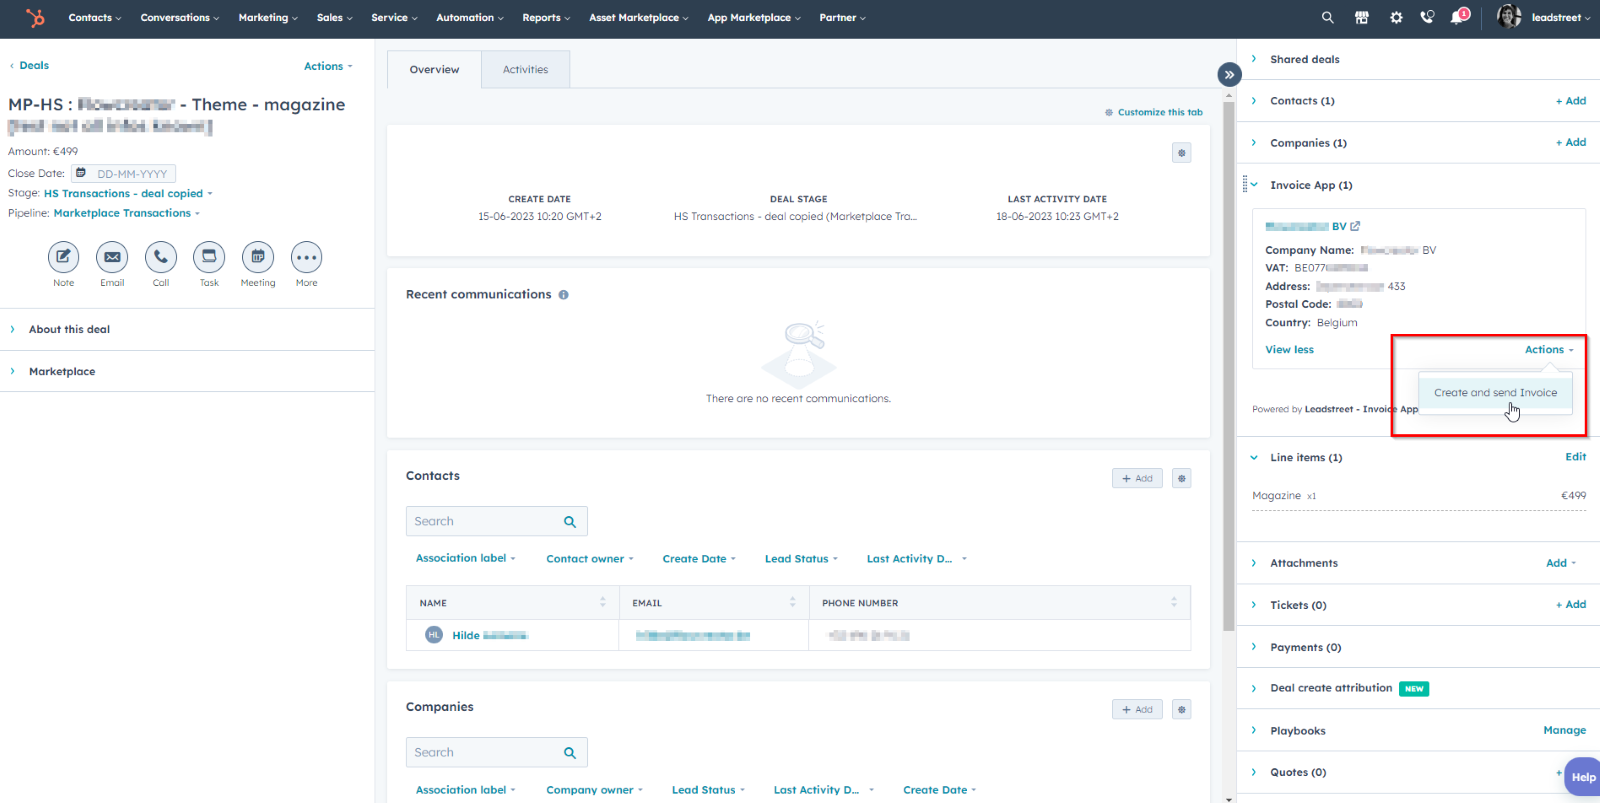
Confirm with Yes
The invoice will be created and sent automatically to the Company Invoice Email (setup Pipeline settings in your invoice app).
Make sure you define - through a workflow - which emailadress should be the “Company Invoice Email”.

Now you can see that the invoice was created and sent

If you turn on the filter activities for Leadstreet – Invoice app, you see in the Activity overview the invoice was sent

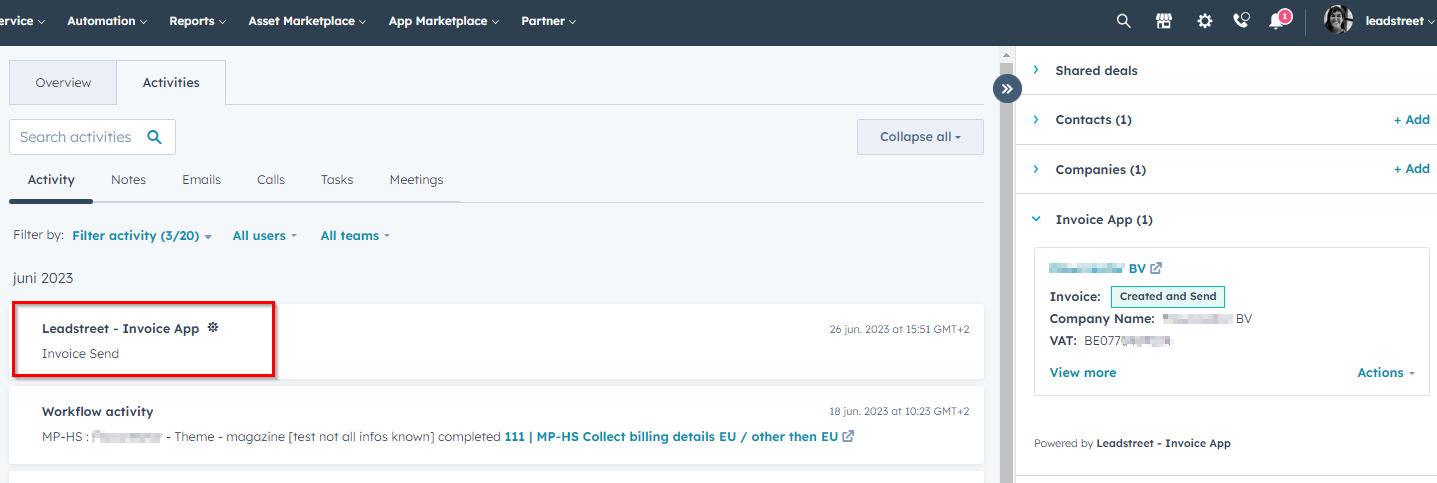
Plus, you can consult the invoice pdf under the timeline menu Notes.

The invoice is stored automatically under the Root folder (+subfolder) you created into the invoice app

Congratulations!
You created an invoice through the invoice app and know where to consult the invoice pdf. Great job!
Any Questions
Please contact our support team via this form