
Using File Manager
Upload files of any type to HubSpot and attach them to contacts, companies or deals. You can:
- Upload File: attach files to one record at a time.
- Bulk Spreadsheet: attach files to several records in one go. Upload a spreadsheet where each row links to an external file, with the columns object_type, object_identifier, file_url and file_name.
- Bulk ZIP: attach files to several records in one go. Upload a ZIP file with CSV files and the files themselves.
Setup in PocketKnife
Choose File Manager in the left side bar
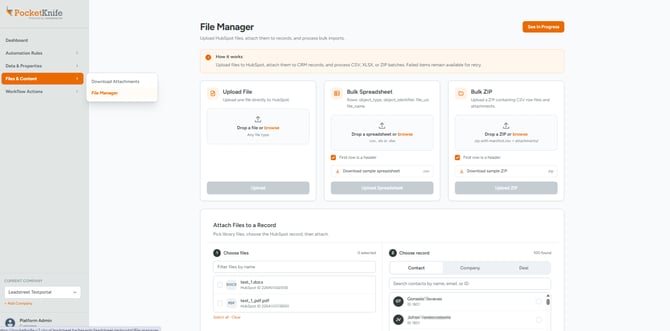
PocketKnife gives you three ways to upload files of any type:
- Upload File: attach files to one record at a time.
- Bulk Spreadsheet: attach files to several records in one go, using a spreadsheet with links to the files.
- Bulk ZIP: attach files to several records in one go, using a ZIP file with CSV files and the files themselves.
Option 1: Upload File
With Upload File, you attach one or more files to a single contact, company or deal record at a time.
The files are saved in the File Manager subfolder of the PocketKnife folder in your HubSpot file manager.
How to upload a file
- In the Upload File section, drag and drop a file or click to browse for one.
- Click Upload.
- Repeat steps 1 and 2 for each file you want to add.
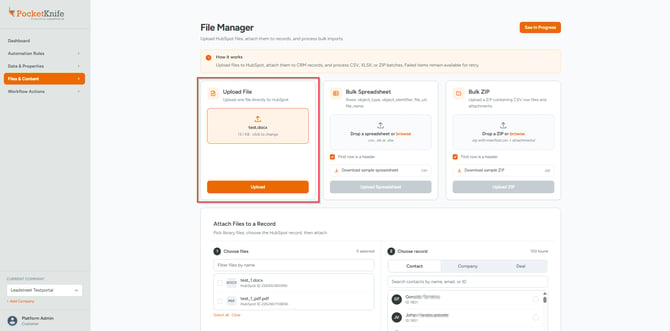
- The file(s) now appears in the Attach files to record section.
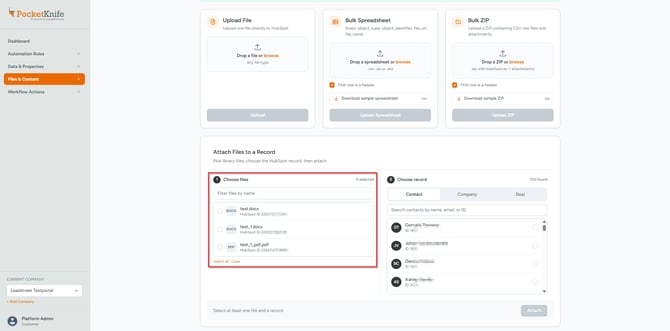
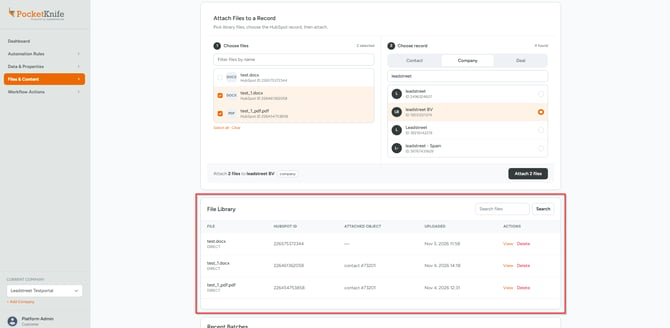
- In the Attach files to record section:
- under Choose files, select the files you want to attach. Use the filter to find a file by name, or click Select all.
- Under Choose record, click Contact, Company or Deal, then select the record. You can search by name, email or ID.
- Click Attach files to attach the selected files to the record.
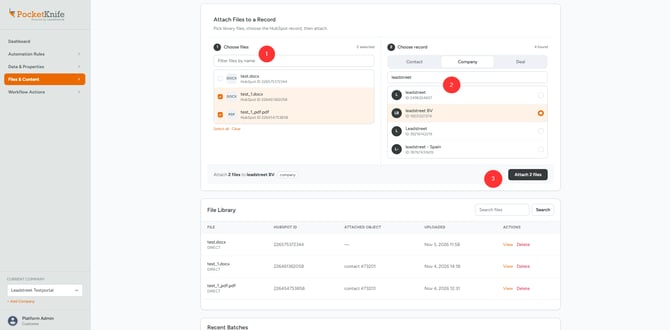
- Go to the File Library section to view the files you uploaded and attached.
Option 2: Bulk Spreadsheet
With Bulk Spreadsheet, you attach files to several contact, company or deal records in one go. Each row in your spreadsheet links one file to one record.
The files are saved in the File Manager subfolder of the PocketKnife folder in your HubSpot file manager.
-
First, prepare your spreadsheet with one column for each of these fields: object_type, object_identifier, file_url and file_name. Or click Download sample spreadsheet in the app and fill in that file.
- If you have a lot of files to attach, you don’t have to list one by one. Make it yourself easy and copy the files into your Excel upload file. Follow this link to find out how to do that. And then come back here to proceed.
- Once your file is ready, most of the job is done.

Spreadsheet format
Use a CSV, XLS or XLSX file with these columns:
- Column A – object_type: the type of HubSpot object you want to attach the file to: contact, company or deal.
- Column B – object_identifier: the record you want to attach the file to. Use the email address for contacts and the record ID for companies and deals.
- Column C – file_url: the link to the path.
- Column D – file_name: the name the file gets in HubSpot.
💡Pro tip
-
For a comprehensive list, export your company or deal information from HubSpot. You will need the name and record ID to make the mapping in your upload sheet. The company record ID is automatically included.
-
For a deal export you may need more info such as the associated contact(s) or company. Make it easy for yourself to recognize the deal you want to add the files to and choose to export the deal info that can help you with that.
How to use Bulk Spreadsheet
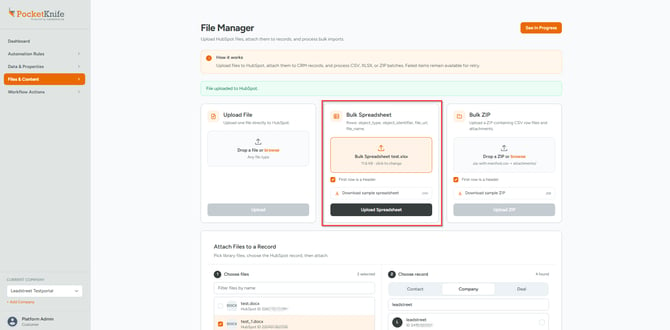
- In the Bulk Spreadsheet section, drag and drop your spreadsheet or click browse. You can use a .csv, .xls or .xlsx file.
- Leave First row is a header selected if the first row of your spreadsheet contains column names. Clear it if it doesn’t.
- Click Upload Spreadsheet. The files are queued and processed in the background.
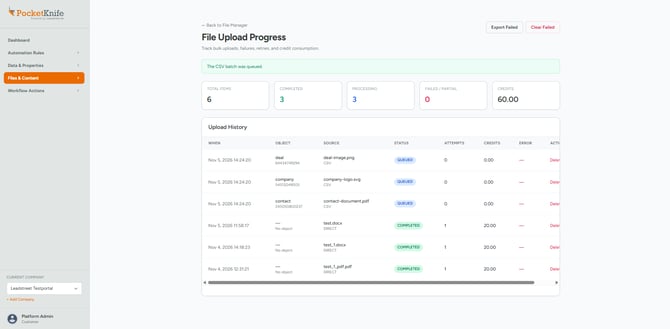
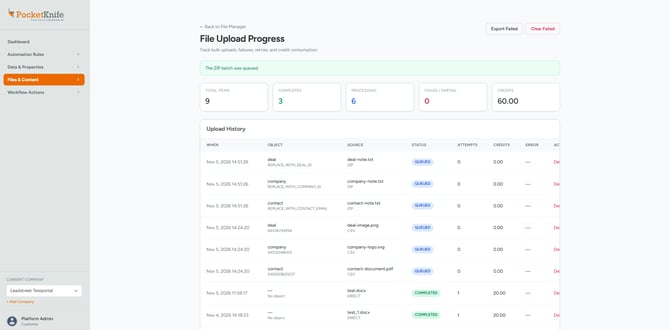
- The File Upload Progress page shows how far your upload is:
- Total items, Completed, Processing and Failed / Partial: the status of all files in your upload.
- Credits: the credits used by your uploads.
- Upload History: one row per file, with the record it’s attached to, the source file, the status, the number of attempts, the credits used and any error.
Option 3: Bulk ZIP
With Bulk ZIP, you attach files to several contact, company or deal records in one go. Your ZIP file contains the files themselves and a CSV file where each row links one file to one record.
The files are saved in the File Manager subfolder of the PocketKnife folder in your HubSpot file manager.
Prepare your ZIP file
Prepare your ZIP file with the steps below, or click Download sample ZIP in the app and use that file as a starting point.
- Step 1: collect your files
- Put all the files you want to upload in a folder called attachments.
-
Step 2: create the CSV file
-
-
Create a CSV file named manifest.csv that lists every file you want to upload and the HubSpot record it should be attached to. Use the same columns as for Bulk Spreadsheet, with one difference: in file_url, enter the path to the file inside the ZIP, for example attachments/contact-note.txt.
-
If you have a lot of files to attach, you don’t have to list one by one. Make it yourself easy and copy the files into your Excel upload file. Follow this link to find out how to do that. And then come back here to proceed.
-
Once your file is ready, most of the job is done.
-

Spreadsheet format
Use a CSV file with these columns:
- Column A – object_type: the type of HubSpot object you want to attach the file to: contact, company or deal.
- Column B – object_identifier: the record you want to attach the file to. Use the email address for contacts and the record ID for companies and deals.
- Column C – file_url: the path to the file inside the ZIP, for example attachments/contact-note.txt.
- Column D – file_name: the name the file gets in HubSpot.
- Step 3: create the ZIP file
- Add the attachments folder and manifest.csv to one ZIP file.
-
- This is what your ZIP file should look like.

💡 Pro tips
- Collect all the files you want to upload in one folder, together with your CSV file.
- Keep the total size under 30 MB. Have more files? Spread them over several folders and repeat the steps for each folder.
How to use Bulk ZIP
- In the Bulk ZIP section, drag and drop your ZIP file or click browse.
- Leave First row is a header selected if the first row of manifest.csv contains column names. Clear it if it doesn’t.
- Click Upload ZIP. The files are queued and processed in the background.
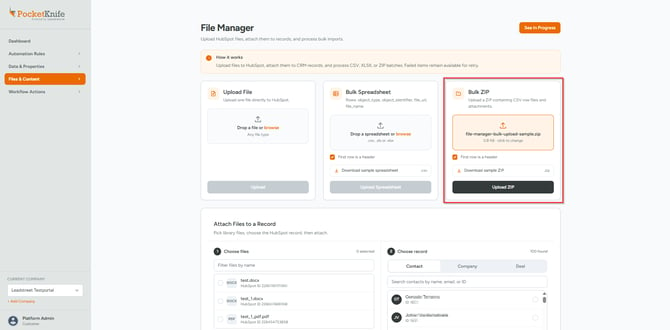
Follow the progress of your upload in the Recent Batches section, or click See Progress in the top right corner for more details.
Add many files to your spreadsheet at once
Have a lot of files to attach? You don’t have to type them one by one. Copy the file names straight into your spreadsheet.
-
Use shift to select all files you want to copy to your upload Spreadsheet

-
Right-click + choose Copy as path (Als pad kopiëren*)

*The language depends on the laguage settings of your device
-
Special paste (Plakken speciaal*) into column C of your Excel upload sheet

-
Choose Text (Tekst*) + click ok

-
Now your files are pasted as remote files

-
To keep only the file name, we’ll recplace the prefix with nothing
Select the column you pasted your files + copy the prefix you are going to replace with nothing. Just to keep the filename.

Paste the prefix into Search for (Zoeken naar*) + leave Replace with (vervangen door*) empty + click Replace all (Alles vervangen*)

The remote file names are replaced with just the file name. If you want, you can add a new file name in column D to attach to your HubSpot object(s)

⚠️Attention!
Save your spreadsheet with the file name manifest. This prevents errors during the upload.
Your spreadsheet is ready and most of the job is done.
- Bulk Spreadsheet: go back to How to use Bulk Spreadsheet to start your upload.
- Bulk ZIP: first save your spreadsheet as a CSV file (manifest.csv) and go back to Step 3: Create ZIP file.
Troubleshooting
- Timeout: click Retry to try the upload again.
- Object not found: the record couldn’t be found, probably because of a typo in the record ID or email address. You can:
- correct the record ID or email address in your spreadsheet and upload it again, or
- attach the file manually with Upload File.
Check your progress and credits
In File Manager, click See Progress to follow the status of your uploads and see how many credits they have used. The number of credits allowed depends on your subscription plan (Freemium, Single Feature, Pro or Enterprise).
To upgrade, click your username, go to Subscription & Billing and choose the plan that fits your needs.
Any Questions
Please contact our support team via this form